Are you also having issues capturing Windows 8 images with the imageX.exe command?
What is ImageX
ImageX is a command-line tool that enables original equipment manufacturers (OEMs) and corporations to capture, modify, and apply file-based disk images for rapid deployment. ImageX works with Windows image (.wim) files for copying to a network, or it can work with other technologies that use .wim images, such as Windows Setup, Windows Deployment Services (Windows DS), and the System Management Server (SMS) Operating System Feature Deployment Pack.

The issue using ImageX to capture Windows 8 Images
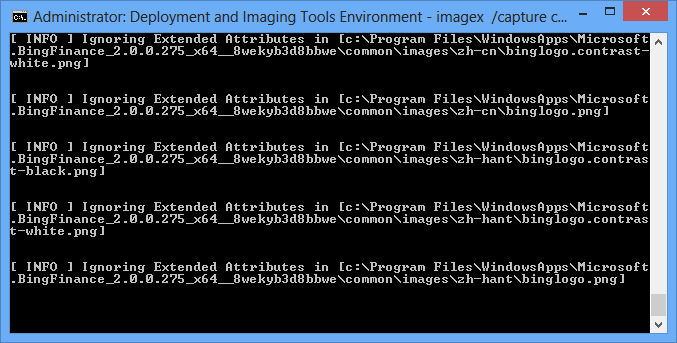
I recently had to capture a Windows 8 image I have created on a new project I have been involved in. I have been capturing many Windows 7 images and thought that I could just do it the same way with Windows 8 images, but I was wrong! When I started capturing the image as I normally do, I got a lot of warnings as you can see below:

Why you should not use ImageX to capture Windows 8 images
Windows 8 use something called extended attributes that imageX apparently does not support. If you try to capture a Windows 8 partition with ImageX you will see a lot of warnings about extended attributes. In the end the capture will complete, but it will take forever and it will not include the Extended Attributes. Instead of using imageX you should take a look at the new version of dism.exe for Windows 8. The new version of DISM has new command-line options for capturing and applying images.
New WIM options in dism.exe for Windows 8
According to Microsoft themselves imageX.exe has been deprecated and instead dism.exe has been improved with some extra WIM commands. The new version of dism.exe is built-in to Windows 8, but you might also want to download the Windows Assessment and Deployment Kit (ADK) for Windows® 8 to create a bootable version of WindowsPE 4.0. Some of the news in WindowsPE 4.0 is that it has support for Windows PowerShell and .NET Framework support.
The new command option for Image capturing:
dism /Capture-Image
The new command option for applying images:
dism /Apply-Image
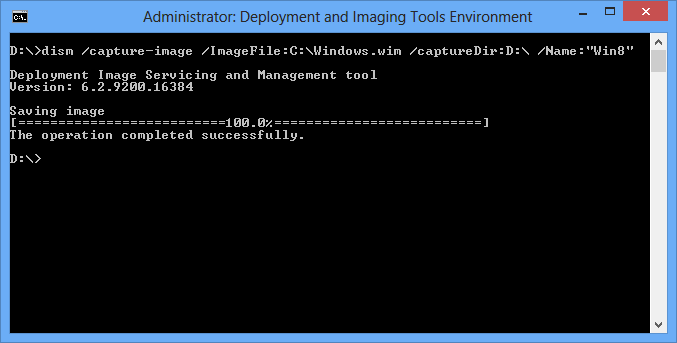
If you want to capture a Windows 8 image your command could look like this:
dism /Capture-Image /ImageFile:D:\Windows8x64.wim /CaptureDir:C:\ /Name:”Windows 8 84 bit partition” /compress:fast
If you want to apply an image to a partition the command would look something like this:
dism /Apply-Image /ImageFile:D:\Windows8x64.wim /index:1 /ApplyDir:C:\

More information about dism.exe for Windows 8
Conclusion if image capture
I hope that you found this post useful and got a little bit wiser about the new commands in dism.exe for Windows 8 and Windows 10. To sum up, you should use the new parameters in dism.exe when working with images instead of the old and deprecated imageX command that worked so well in Windows 7. You are very welcome to drop me a comment below if you have any questions or just want to leave me a comment.


I want to ask a question , My favorite web browser is Mozilla Firefox , But whenever my younger brother installs Google Chrome , My Windows 8 becomes too slow . Any solution ?
I doubt that installing Google Chrome will make a Windows 8 computer running slower. Maybe he has also installed other software or made some other changes that you don’t know about?
Hey Thomas,
It’s very timely that I read this post of yours since I just upgraded my OS from Windows 7 to Windows 8. Well, I don’t have a problem so far since I have been preparing myself to use Windows 8. But, I won’t deny that I still need to learn a thing or two about Windows 8 so that’s the reason why I said it’s very timely for me to read this post. Another lesson learn. Thanks for this.
Hi Farrell
The issue I describe in this post is only a matter if you are deploying Windows 8 images for rapid deployment. Otherwise you will be just fine.
Do we have any other method for fixing attributes i think this would is a complex one.
Regarding capturing Windows images or what do you mean?
Yes Thomas regarding capturing windows images
The dism /Capture-Image command does the trick for me.
Really nice tips admin.
Totally awesome post.
Thank you for sharing
Thomas really nice input here. I see there are some problems with Image X. I prefer to capture all my images by using FOCA which is a great tool giving you the opportunity to make much more than that. i.e Metadata extraction from images on the fly. Give it a try. It’s free anyways.
Thank you for this it is just what I needed! The imageX thing was driving me nuts.
Dear Sir ,
I’ve made a simple Win8PE and I use imagex to copy it to my harddisk and add the Win8PE to boot menu :
imagex /apply boot.wim 1 H: /verify
Now I want this H:Win8PE return to boot.wim , how can I do it ? I’ve tried :
imagex /capture h: d:boot.wim “Drive H”
Then I put this d:boot.wim back to the original Win8PE.iso but boot with a blue screen
Please help
Hi Kevin
I am not sure why you end up with a blue screen. Try to add a question to the Microsoft TechNet forum. There is a lot of skilled people there who properly can help you out:
https://social.technet.microsoft.com/Forums/windows/en-US/home?forum=w8itproinstall
I have tested the new dism commands and they work great with Windows 8. It also make great sense that we can do all the imaging commands we need with on tool.
It for sure does. I really don’t miss ImageX 🙂
Are you sure your deployment share has the latest ImageX and WIMGAPI files? The extended attribute messages were present in beta versions of the ADK, but are no longer present in the final RTM version.
Hi
ImageX is no longer needed. The capture and apply functions has been added to the dism command for Windows 8. It makes great sense with one tool that can do all the imaging tasks:
https://social.technet.microsoft.com/Forums/en-US/7c0cb728-11a5-4053-aabe-d00117de2fc5/imaging-windows-81-with-imagex?forum=w8itproinstall
I actually had problems with extended attributes on my Windows 8 and the process above kind of help me through to fix it….!!
Appreciate it… Thank you