In this guide, I will show you how you can import images to Active Directory that your users Outlook clients will show in an Exchange and MS Lync environment making it all more interesting.
In big organizations where new employees are hired all the times, it can be a big help using face pictures in Outlook and Lync clients to make it easier when communicating with colleges that maybe are not even working in the same building or even the same country. The solution I will show you below are using the thumbnailPhoto attribute introduced in Active Directory back in Windows 2000. I will show you how you can import an image to each user in active directory to make it easier to recognize colleges in Outlook and Lync. Be aware that the images will have to be in jpg format and that the file size not can exceed 10 kb.
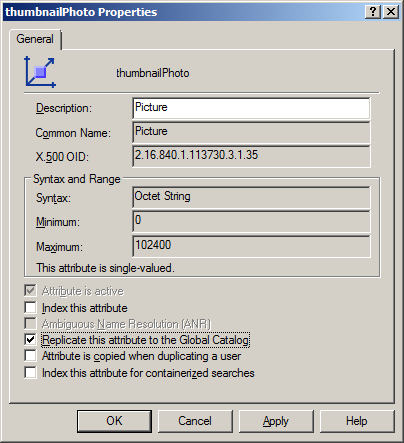
First we will make sure that the data are replicated to all global catalog servers
1. Execute the command: “Regsvr32 schmmgmt.dll” from a command prompt.

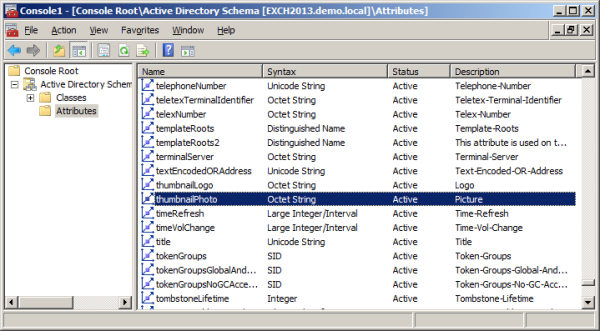
2. Open an MMC console (mmc.exe) and add the Active Directory Schema snap-in to the console.
3. In the Active Directory Schema snap-in, expand the Attributes node, and then locate the thumbnailPhoto attribute.

4. In the Properties page, select “Replicate this attribute to the Global Catalog“, and click OK

Replication might already be select. Otherwise, select it and click OK.
Import image using PowerShell cmdlet
You can use the script example below to import a picture for each user to Active Directory.
Import-RecipientDataProperty -Identity "Thomas Nielsen" -Picture -FileData ([Byte[]]$(Get-Content -Path "C:\pics\thomas.jpg" -Encoding Byte -ReadCount 0))Import images to AD using AD Photo Edit
If you are not too experienced with PowerShell and scripting you can use a freeware program called AD Photo Edit to upload your photos for each user in Active Directory instead. Just install the program, Search for the user you want to assign a photo and follow the instructions. Adding images to Active Directory is very easy with this little tool.
I hope you found this post useful and you are very welcome to drop me a comment below of you have any questions.


Thank you Thomas for showing us the Tutorial…
Very interesting and informative Thomas, and this is one of the reasons that your blog is always in my RSS feed. 😉
Thank you Karen. I enjoyed writing this post myself. It is always fun to discover new possibilities to existing products.
My pleasure Thomas, I do stop by quite often and read, just a bit lack lustre on the commenting, I’m afraid, you know how it is 😉
Thanks Thomas,
I have a question do you know anyother program like this one that you used?
Hi Jack
There is also this one: http://www.exclaimer.eu/outlook-photos/
very nice tutorial, you have explained each and every step very clearly, thanks once again
Thank you Mr.Thomas for this great information with compelete tutorial. I really enjoyed it.
Nice and amazing tutorial Thomas . I’d try this out and hope that it works for me as well .Thanks for sharing the info .
-Pramod
Hi Admin,Its a very nice article about this type of topic,I seems you have a better experince over this.A well written and explained article..keep it up would love to read more like this form you
Seriously, you have done a lots of hard work, i am subscribing to your blog post, because the talent that you have is amazing and i appreciate your hard work, your words are amazing in your posts and i want to hear more from you.
Thanks for the complete tutorial! I’ve been looking for this one and I tried it and it works good!